Friday 20 November 2015

New Central heating boiler

Today we have fitted a new central heating boiler a few months worrying in malfunction by the now 10 year old Nefit Smartline HR/ C24/CW4 Basic Combi.
This combination boiler has so far done with minimal maintenance (1x DIY cleanup and replacing ionization pin). In recent months suffered from 3L failures, this probably means a new fan a € 280 and you have to assemble it yourself. But it could also be a burner controller UBA a € 200 according to the people of Nefit. After a lot of information gathered from forums, neighbor installers or the like, I decided to replace the boiler.

By the men of Warmteservice (good parts store) made an appointment with an installer that installs many Vaillant boilers with 12-year warranty on parts. The choice fell on the energy efficient Vaillant ecoTEC+ (2x in a row "as best tested" by the Consumers' Association) and costs of installation and guarantee about € 1,500 (€ 100 cash back by Vaillant), but then you get some!
Model: CW4 VHR 25-30/5-5) energy class A is for heating and hot water (14.3 l / min at 40 ° C), quiet (46 dB) and hopefully little failures.


The Honeywell Chronotherm IV I replaced by the Vaillant calorMATIC 370 (black / SS) that operate very easily by hand with a large knob or weekly program and modulating connected to the eBUS of the Vaillant boiler.
The old boiler and thermostat I sold on Mark Place respectively 100 and 30 euros

Friday 6 November 2015

Silent PC fans

Ordered at AliExpress:
Lonyo PC Cooling Fan 12cm, brushless,
Dimensions: 120x120x25 mm
Design: Nine Sickle Leaves
Speed: 1100 RPM ±10%
Rated Voltage: DC 12V
Rated Current: 0.25A
Air Flow: 88 cfm
Noise: 20 dBA
Bearing type: Hydraulic
Connector: 3 or 4-Pin (2 pin used) - GND, 12V, Tach (rpm signal)
Life: 50.000 hours
Price: €12,50 / 2 pcs

I Tested RPM with Arduino:
12V - 1220 rpm
  9V - 1100 rpm
These fans are really quiet and give plenty of air flow.


Note: DIY Fancontroller: YouTube with 10k variable resistor and LM319 NPN Transistor

Wednesday 4 November 2015

Arduino project: Nino the mini pan/tilt robotbird

Nino is very intelligent ...
(because I monitor him ;-)

In the studio                                     In front of the camera

Arduino Uno with prototype shield and external mini
DC/DC 3A power supply module to servos

Short movie (1 minute) coming soon ...


    My other breadboard projects ...


    Projects:
    • Arduino Blynk Sync; Climate controller DWC-grow cabinet
      using iPhone App and datalogger.
      (monitors several temperatures, humudity, pressure,
      timer and thermostat relay control).
    • Arduino control using Ethernet, WiFi and Bluetooth
    • Ultrasonic Waterlevel sensor
    • Automatic height adjustment of Fluorescent fixture
      using mini laser scanning
    • Fan control by humidity sensor
    • Digital pH and EC (TDS) sensors (display, App)
    • Alarm clock with a temperature/humidity readout on LCD with keypad
    • DIY basic course in electronics (focus on development
      and management of projects).

    Sunday 18 October 2015

    Arduino project: Control and Logger for Aeroponics Grow Cabinet

    This unit will control my Micro-Aeroponics-Grow-Cabinet (w. Bubble Bucket)
    • Arduino Uno (or Mega) with shields and sensor connecting board
    • Ethernet Shield connected to Blynk (iPhone App);
      (create dashboard for monitoring sensors and switching two relays: (1. Timer for Lamp;  2. Thermostat for Heater).
    • Datalogger Shield with SD-card and Real Time Clock (for timestamp);
      Logger via Ethernet (future WiFi) to Xively channel and visualizing in graphs by Github.
    • External power supply for sensors en relays.
    • Casing for Arduino board and shields, water resistant with clear cover;
      In/out: DC-9V, Ethernet-Cat5, DS18B20-RJ11, DHT22-RJ11, Relays-RJ11, optional: USB to iMac.
    • Casing for Relay/Power Outlet;
      In/out: AC230V, RJ11 (4 wire) to Arduino board.

    Sensors:
    1. Barometer (Pressure/Temp sensor BM-180).
    2. Temperature and Humidity at the top of the plant (DHT22).
    3. Luxmeter (Illuminance sensor BH1750).
    4. Timer relay control lamp (Blynk dashboard).
    5. Thermostat relay control heater in the water container (waterproof Temp. sensor DS18B20).
    6. Waterlevel: distance w. Ultrasonic sensor module by independent Nano.
    7. pH-sensor by independent Uno (w. Bluetooth Bridge).
    8. EC-sensor (future extension pH-board with EC/TDS sensor (conductivity).


    2-relay module in mini casing: switches Timer-relay and Thermostat-relay


    beta version in a test tray, the final casing is in order.
    a larger version as the relay-casing
    for Arduino Mega and connection parts


    Sunday 11 October 2015

    Arduino projects

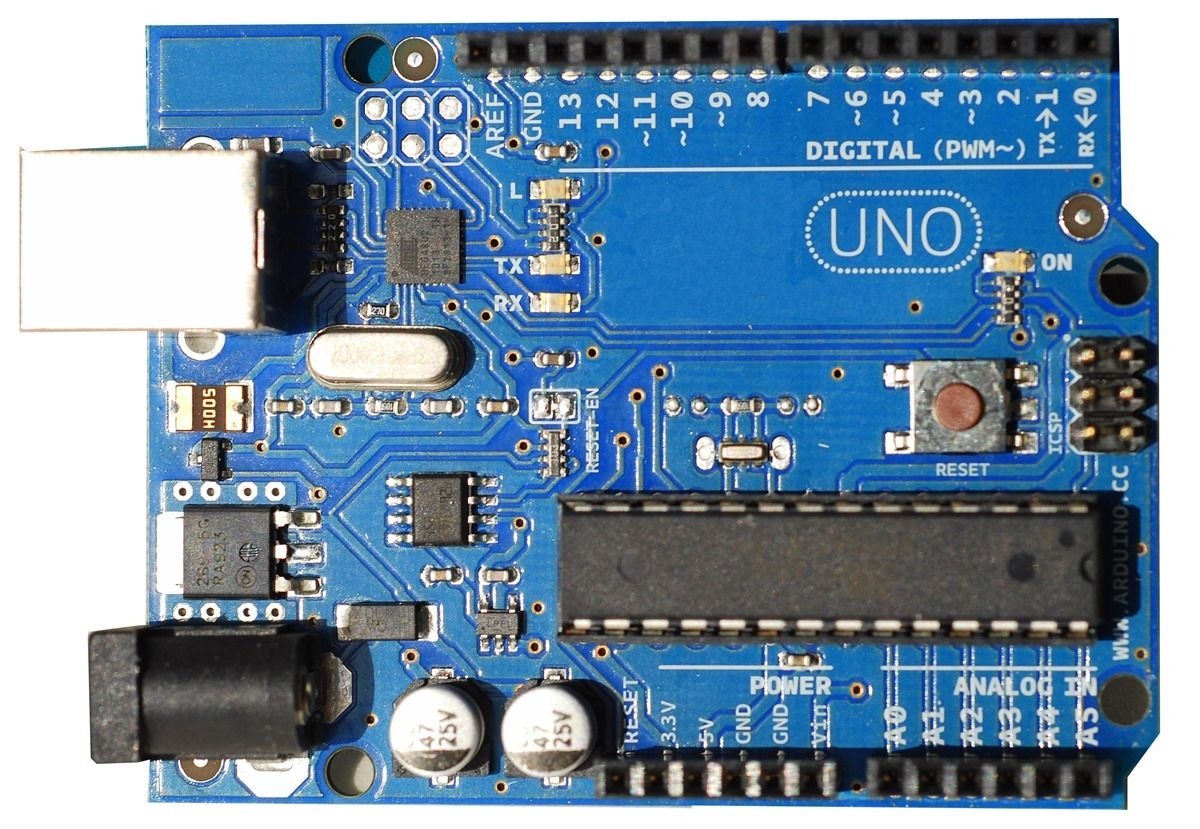
    I'm now developing a number of weeks to Arduino projects (and Chinese clones) and already acquainted programming with different components. Various sensors (temperature, humidity, light intensity, water level, soil moisture etc.) connected with mini LCD screens, leds or an iPhone App . A stepping motor, mini servos, relays, LEDs, ultrasonic distance meter, alarm clock, data logger with SD card, WiFi module, Nano etc. I learn and apply combining for future projects.
    Coming weeks there are orders with an Ethernet shield, Bluetooth module, the Arduino Mega, pH sensor, a mini-laser, barometer and more components.
    The hobby / study room has been cleaned up nice and technically equipped to develop the electronics projects. Many basic electronics I make my own and I purchased a fine soldering iron with ceramic element and adjustable temperature control which I practice to learn to solder properly.


    Controle met Arduino

    De zeer handige link naar Wforum, de Getting Started en mooie voorbeelden.
    Op YouTube zijn er ook talloze voorbeelden: zoek maar eens op arduino gardening.

    Doel:
    Ik ben nu eerst aan het bepalen wat ik er eigenlijk mee wil?:
    1. Allereerst leren, dat blijf ik altijd doen, beginnen bij het pielen met ledjes e.d., programmeren etc.
    2. Controle kweekhok (diverse temperaturen, RV, grondvochtigheid, pH, EC handmatig en op het web) en eventueel later ....
    3. Automatiseren (bijv. irrigatie, voedingscomputer te besturen vanaf het web of een app).

    De Parrot Flower Power heb ik dit jaar gebruikt bij de buitenkweek en dat beviel me erg goed. De 4 sensoren in de Flower Power geven data door aan een app op de iPhone. Ook wordt er een webpage met grafiekjes aangemaakt, erg leuk allemaal.

    Open Garden heeft een zeer complete Arduino shield (gateway €60) voor sensors eventueel aangevuld met hydroponics shield voor pH, EC en Temp (Kit: €200). Je kunt hiermee gemakkelijk een compleet controlestation maken met losse nodes per plant (€100) en controle via web/app. Ook Waspmote is zo'n sensoroplossing. Dit lijken mij allemaal prachtige systemen alleen veel te duur voor mij, dus ga ik een Arduino systeem bouwen en programmeren met losse chinese onderdelen van eBay of AliExpress.

    Komende maanden wil ik me focussen op het controleren (en later ook automatiseren) van een semi-hydro/dwc kweek, dwz kleine kast met 2 planten in potten die boven waterbakken hangen.
    Naast de temperatuur en luchtvochtigheid in de kast bij de planten, wil ik o.a. de temp van de waterbakken gaan loggen en bloggen, later aangevuld met pH, EC en misschien DO? (dissolved oxygen)


    Mijn eerste Arduino project: 

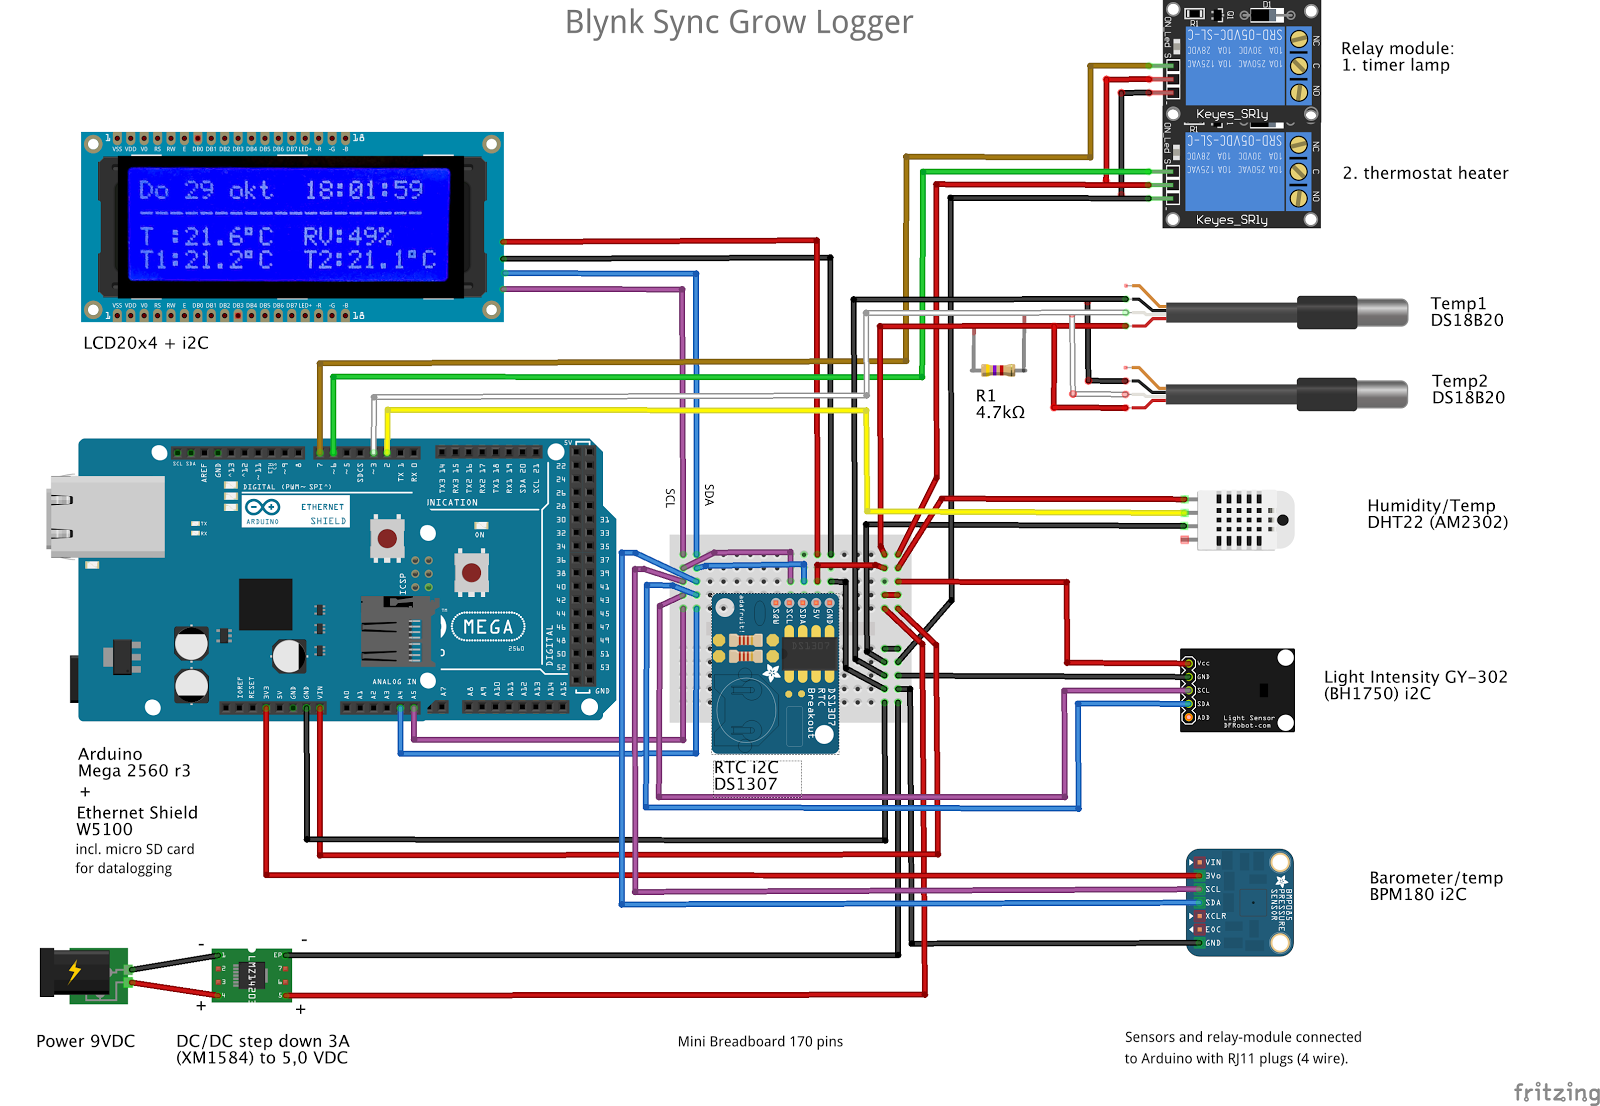
    Controle van DWC-ontkiembak (5 liter waterbak met met bubbels)
    1. Temperatuur waterbak monitoren (DS18B20); schakelen 7W-warmtematje (onder de waterbak).
    2. Temp en RV in de propagator (DHT22: €3,10)
    3. Timer voor lampje 11W (RTC-module: €0,85)
    4. Webserver/app
    5. Waternivobijv. met (fuel)vlotterschakelaars, DIY Capacitive Liquid Level electrodes of Ultrasoon (mijn voorkeur))
    6. Luxmeting (BH1750FVI)
    7. pH-waarde
    8. EC-waarde


    Arduino projecten toekomst:

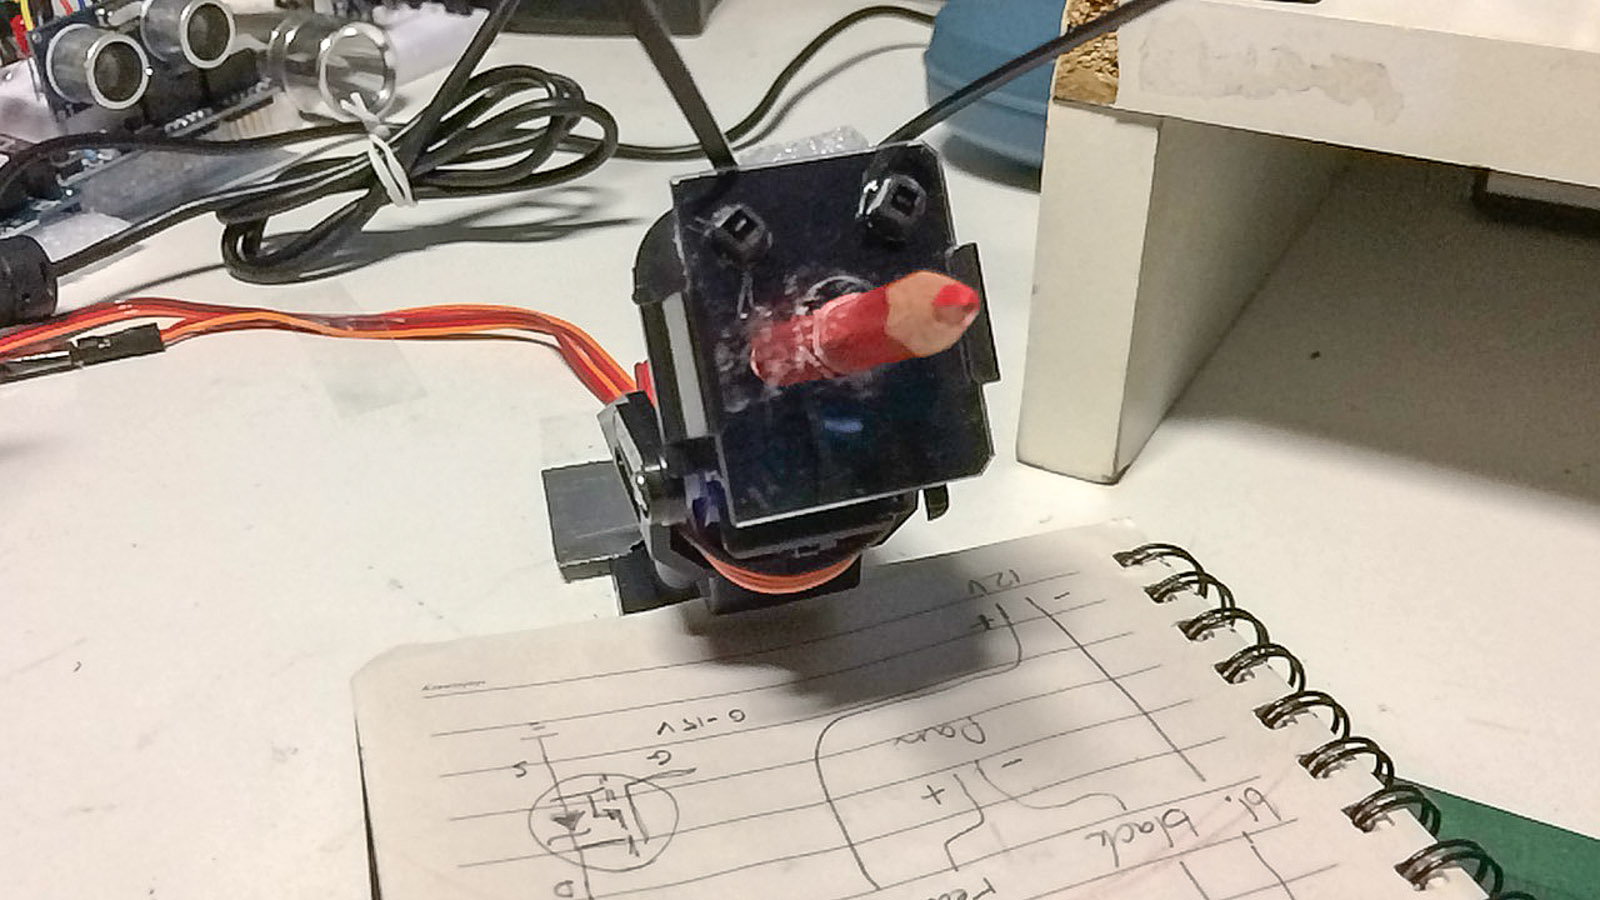
    • Pan/tilt webcam (CM210 HD720 met mini servo's €30-35) 
    • Automatische lichtarmatuur hoogteverstelling (ca. 5 cm boven de planttoppen, zodat deze niet tegen de TL's aangroeien)
    • Digitale tensiometer (DIY)
    • Voedingsdoceer unit DWC
    • Automatische pH-regelunit DWC

    Friday 2 October 2015

    Concert Steve Hackett - Acolyte To Wolflight

    fryday Oct 2, 2015

    20:30h  De Boerderij

    Steve Hackett bracht in maart zijn nieuwe album Wolflight uit.
    Op 2 en 3 oktober 2015 is Hackett live te zien in Cultuurpodium Boerderij in Zoetermeer.

    Deze show omvat een groot deel van Steve’s solo discografie, een selectie met solo materiaal waaronder nummers van albums als ‘Voyage of the acolyte’ (1975) ‘Please Don’t Touch’ (1978) en Wolflight (2015). Natuurlijk komt ook het materiaal van Genesis Revisited ruimschoots aan bod. De band bestaat naast Steve Hackett uit zanger Nad Sylvan, toetsenist Roger King, drummer Gary O’Toole, saxofonist Rob Townsend en Roine Stolt (The Flower Kings) op bas en ‘12 string guitar’. Wolflight is de opvolger van het album ‘Beyond The Shrouded Horizon’ (2011) en neemt de luisteraar mee op een reis door de ruimte en de eeuwige zoektocht naar vrijheid. De legendarische gitarist kijkt er naar uit om het laatste hoofdstuk van zijn carrière toe te voegen en samen met zijn loyale fans zijn muzikale evolutie te beleven.

    YouTube: Wolflight (official video)


    Saturday 26 September 2015

    Basic Electronics and Arduino Tutorials

    Ohm's Law - The basis for all electronics and electrical calculations is Ohm's Law (I=V/R). If you remember this, you can figure out what size resistor to pair with an LED, how to control the speed of a motor, how to build a power supply, and more. It's that important. There are three main variables in electricity, (I) current (amps), (V) voltage (volts) and (R) resistance (ohms). There's also a 4th element, (P) power (watts). Ohm's Law says that if you know two variables, you can calculate the third. - Online Calculator

    Power vs. Energy - DC Watts = volts * amps is important, especially in solar and battery calculations, and the time element, hours, is critical. A motor that draws 5 amps, is drawing 5 amps (power) as we speak. In one hour, it will have consumed 5 amp hours (ah)(energy), in two hours it will have consumed 10 ah. When multiplied by the voltage we get watt hours (wh). This (wh) is called Energy. Energy is what you get billed for by the Power company (kWh). Watts without time is called Power. Many people get this confused, and some websites deliberately muddy the waters to make their products sound better. If you see things like amps per hour, or watts per day, run away.

    Not to confuse things too much, but in Alternating Current (AC), it's not quite this easy. It starts out the same, Watts = Volts * Amps, but we also have to divide the Power Factor. A resistive load, like a heater, has a power factor of 1, so 1200w / 120v = 10a / 1 = 10a is the same as the DC calculation. But a electric motor, computer or fluorescent light may have a power factor of .5, so 1200w / 120v = 10a / .5 = 20a. That's a much higher load, so wires and generating capacity have to be increased. We often use VA for some calculations instead of watts. You'll see transformers rated in VA, as the load power factor isn't known by the manufacturer.

    Wire Sizing Calculator - Enter the voltage, number of amps, and the distance you need to run, experiment with different wire sizes until you get a 3% or less voltage drop. It's at the bottom of the page


    Soldering
    Basic Soldering Guide (UK Centric)
    Soldering 101
    Sparkfun - How to solder

    Basic Electronics
    http://www.electronics-tutorials.com/basics/basic-electronics.htm
    http://www.abcofelectronics.com/


    Arduino
    I have gone through many online Arduino tutorials and video's, but some of the best I've run across are the ones at Adafruit. They explain what electronics components you will need, how to connect them, and how to write the code to use them, in a simple to understand and building block style. Basic electronics theory and programming theory is explained along with practical examples. Each tutorial builds on what you learned previously.

    More Arduino tutorials and projects can be found at:
    Adafruit
    Sparkfun, Inventors Guide pdf
    Hacktronics
    Arduino.cc
    Mindkits
    arduino.nu (dutch)
    arduino programmeer manual (dutch pdf)
    domoticX knowledge centre (dutch)
    arduinotronics.blogspot.nl/
    instructables - arduino channel
    open-electronics

    Online webshops for electronics:
    Tinytronics
    Radio Centrum, Utrecht
    SOS solutions (RPi)
    Mouser electronics
    Conrad
    Chinese Webshops,  AliExpress.nl

    Wednesday 9 September 2015

    Arduino Parts

    Arduino Uno R3 starterskit:

    AliExpress: €4,99
    1x Uno R3 compatable CH340
    1x USB cable
    1x Male to male Dupont cable 20 pin
    1x Breadboard 400 holes
    15x LED red, green, yellow
    10x Resistor 220 Ohm
    10x Resistor 1K
    10x Resistor 10K
    10x Resistor 100K
    2x Photoresistor GL5516
    6x Button round, red white blue
    1x Connector to 9V battery
    4x 40-Pin 2.54 mm 
    pitch
    + ordered separately: 4x Temperature sensor DS18B20, 100 cm, rvs, waterproof, €0,99


    Chinese Uno €3,60                    Arduino Uno €11,50:


    Temp. sensor DS18B20
    AliExpress: €0,99 pp


    AliExpress: €2,54
    Resistor starterkit:
    7x30 Resistor 100r, 1K, 4,7K, 10K, 47K, 100K, 1M
    4x Potentiometer 15mm, 2x10K, 2x100K
    12x LED Green,Red,Yellow,White
    6x Switch body 12*12 tact
    9x Switch cap round - blue, red, white
    6x Switch cap square - black, green
    2x 40-Pin 2.54 mm pitch


    Ordered from AliExpress:

    Boards:  Uno R3 Starterskit €4,99;  Mega 2560 R3 (Arduino compatible) €5,53;  Uno R3 (Arduino compatible) €3,60 x3;  Nano R3 (CH340 USB driver - Arduino compatible) €1,78 x3;

    Shields:  Ethernet shield W5100 €3,29;  Data Logging Shield €3,78;  Proto Shield (expansion board w. mini breadboard) €1,31 x6;  WiFi Shield CC3000 €14,24;

    Break-out modules:  Micro SD-card reader module €0,65;  Bluetooth module HC-06 €2,72;  WIFI module ESP8266-01 €2,66;  RTC DS1307 €0,85;  RTC DS3231 €0,72;  Relaismodule 5V 2-channel €1,71;

    Display:  LCD 20x4 blue screen i2C €3,29;  LCD 16x2 blue screen i2C €1,73; LCD 16x2 Keypad shield €2,38; Lcd-module tft 2,4" touchscreen €3,66;

    Sensors:  DS18B20 temperature €0,99 x4;  DHT22 temperature/humidity sensor am2302 €3,11;  GY-302 Light Intensity module (bh1750 chip) €1,16;  Photosensitive module €0,53 x2;  Soil Moisture  Water Sensor €0,95 x2;  Ultrasonic sensor HC-SR04 €0,72 x3;  Water Level float switch €1,29;  Water Level Sensor Module €0,37 x2;  Raindrops Detection Sensor Module €0,69 x2;  Laser sensor module 650nm 6mm 5v 5mw rood €1,42 x2;  BMP180 barometer €0,80 x2;  pH-module €15,77;  pH-probe €5,49;  PIR motion HC-SR501 €1,09 x2;

    Motor/Servo:  Step Motor 5V 4-Phase + Driver Board ULN2003 €2,01;  Servo MG995 (koppel 15 kg.cm) €4,39;  Servo bracket Pan/Tilt Cam €0,80;  Micro Servo sg90 9g €1,05 x2;

    Components:  Resistors, leds etc. starterskit €2,54; Resistor kit 600x (1/4w metalfilm) €2,45; Variable Resistor Kit 3296W €1,65;

    Prototyping:  Adapter DC 9V 1A Power Supply €1,60;  Breadboard Power Supply 3.3V/5V €0,77; Power supply module dc/dc 3a lm2596s €0,59;  Dupont jumper wires 120x 20cm (m/m, m/f en f/f) €2,11;  Dupont Jumper wires 120x 10cm (m/m, m/f en f/f) €1,80;  Breadboard 400 holes €1,04;  Breadboard mini 170 holes €0,45 x5;  U-jumpers 140 st. €2,35;  Joystickmodule €0,73;

    Soldering Iron 60W; adjustable with ceramic element €7,14;  Tips 5 pc; iron plated (Hakko 936/937 compatible) €3,18;  Multimeter Test Leads €1,91;

    Casing: Plastic project box/clear cover, waterproof,
    158x90x60 €4,58; 115x90x55 €3,29; 100x68x50 €2,41; 85x58x33 €1,76;


    Ordered from TinyTronics:
    Arduino Uno R3 €11,50; Jackpluggen 5,5/2.1 mm (male/fem/fem-terminal); Weerstanden: 150, 220, 4,7K, diodes: 1N4007, 1N4148;


    Carbon film resistors 1/4 W:
    ◼︎◼︎◼︎      10 Ω   brown - black - black
    ◼︎◼︎◼︎      22 Ω   redred - black

    ◼︎◼︎◼︎      47 Ω   yellowviolet - black
    ◼︎◼︎◼︎    100 â„¦   brown - black - brown
    ◼︎◼︎◼︎    220 â„¦   red - red - brown
    ◼︎◼︎◼︎    470 â„¦   yellow - violet brown
    ◼︎◼︎◼︎      1 kΩ   brown - black - red
    ◼︎◼︎◼︎   2.2 kΩ   red - red - red
    ◼︎◼︎◼︎   4.7 kΩ   yellow - violet - red
    ◼︎◼︎◼︎    10 kΩ   brown - black - orange

    ◼︎◼︎◼︎    22 kΩ   red - red - orange
    ◼︎◼︎◼︎    47 kΩ   yellow - violet - orange
    ◼︎◼︎◼︎   220 kΩ  red - red - 
    yellow
    ◼︎◼︎◼︎   470 kΩ  
    yellow - violet - yellow
    ◼︎◼︎◼︎   100 kΩ  brown - black - 
    yellow
    ◼︎◼︎◼︎      1 MΩ  brown - black - green


    Tuesday 1 September 2015

    Groene Pesto maken

    inspiratie: zelfpestomaken.nl

    "Groene Pesto alla Genovese" - ingrediënten voor ca. 200 gram:
      0,5 teen  Knoflook
      1 snufje  Grof zeezout
    25 gram   Basilicum (één plantje is circa 25 gr.)
    15 gram   Pecorino kaas, geraspt
    30 gram   Parmezaanse kaas, geraspt
    10 gram   Pijnboompitten (geroosterd)
    40 ml       Olijfolie (zacht van smaak)
    1 el          Citroensap naar smaak toevoegen